

A 6.7 Cummins belt diagram helps you find the correct belt path fast. This guide explains how to match the diagram to your engine, why routing can differ between 6.7 Cummins setups, how to follow the belt path correctly, and how to make sure the install is right before the machine goes back to work. If the goal is quick, practical help, start with the pulley layout, alternator setup, and A/C setup.
How to Find the Right 6.7 Cummins Belt Routing?
The right diagram must match the engine in front of you. A 6.7 Cummins belt diagram only works when it matches the actual pulley layout and accessory setup.
Start with the front of the engine. Count the pulleys and identify the main driven parts. In most cases, this is the fastest way to avoid using the wrong serpentine belt routing.
Focus on these points first:
- Alternator Setup – Find out whether the engine uses one alternator or two. This affects both the belt path and belt length.
- A/C Setup – Identify whether the A/C compressor is installed. A machine with A/C will not use the same path as one without it. Emergency bypass routing is a separate configuration.
- Pulley Layout – Locate the main belt pulleys, including the crankshaft pulley, alternator, tensioner, idler pulley, fan pulley, and power steering pulley. Then compare the layout to the drive belt diagram before removing the old belt.
- Belt Part Number – If the old belt number is still readable, use it as a supporting reference. It should not be the only reference.
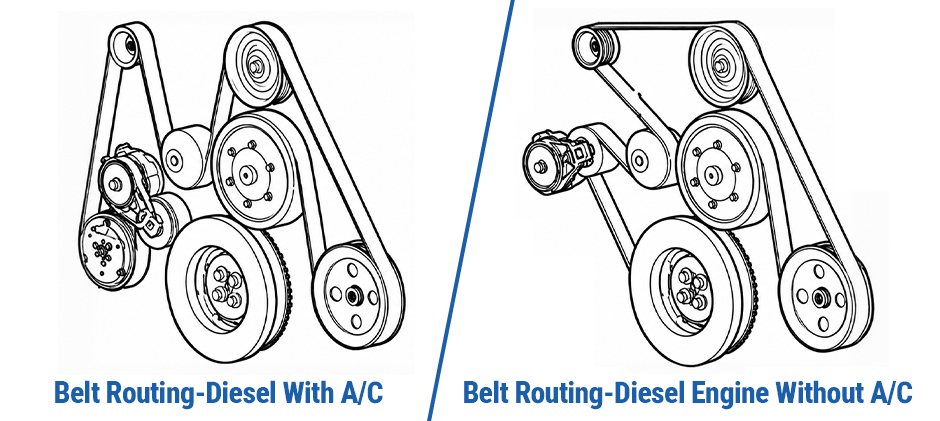
This first step saves time and helps prevent routing errors. It also makes it easier to choose the right serpentine belt, belt tensioner, or idler pulley for the job.
Quick Identification Table
| Item | What to Confirm | Why It Matters |
|---|---|---|
| Alternator Setup | Single or dual alternator | Changes belt path and belt length |
| A/C Setup | With A/C or without A/C | Changes routing |
| Pulley Layout | Number and position of pulleys | Helps match the correct diagram |
| Belt Number | Printed part number | Helps support identification |
| Tensioner Position | Location and movement | Helps during installation |
Why Can the Same 6.7 Cummins Engine Use Different Belt Routing?
The engine name alone is not enough. The same 6.7 Cummins can use different routing because the machine application can change the front accessory arrangement.
This is common in trucks, service vehicles, and off-road equipment. One machine may use a standard accessory setup, while another may have a different charging system, a bypass configuration, or a layout changed by the equipment maker.
Common causes include:
- Different machine applications
- Different model years
- Standard routing versus bypass routing
- Accessory changes made for specific equipment packages
This is why a catalog result should not replace a visual match. If the number of pulleys or the position of the accessories does not match the Cummins 6.7 belt diagram, the diagram is not the right one for that engine setup.
A quick visual review can also help spot wear or misalignment in nearby parts such as the alternator pulley, fan pulley, or A/C compressor pulley. Those parts can affect belt tracking even when the routing is correct.
How to Read a 6.7 Cummins Belt Diagram?
A 6.7 Cummins serpentine belt diagram is easier to follow when the routing is broken into simple steps. The main goal is to place the ribbed and smooth sides of the belt on the correct pulleys.
Grooved pulleys take the ribbed side of the belt. Smooth pulleys take the back side.
Start at the crankshaft pulley. Then follow the path one pulley at a time. This method reduces the chance of skipping a pulley or twisting the belt during installation.
Use this sequence:
- Start at the Crankshaft Pulley – This pulley drives the entire system and provides the clearest starting point for a 6.7 belt diagram.
- Identify Pulley Surfaces – Grooved pulleys are for the ribbed side. Smooth pulleys are for the back side.
- Route the Fixed Path First – Install the belt around the main fixed pulleys before moving the tensioner. This usually makes the last step easier.
- Leave the Tensioner for Last – Move the tensioner only when the rest of the belt is in place. Then slip the belt over the final pulley and release tension slowly.
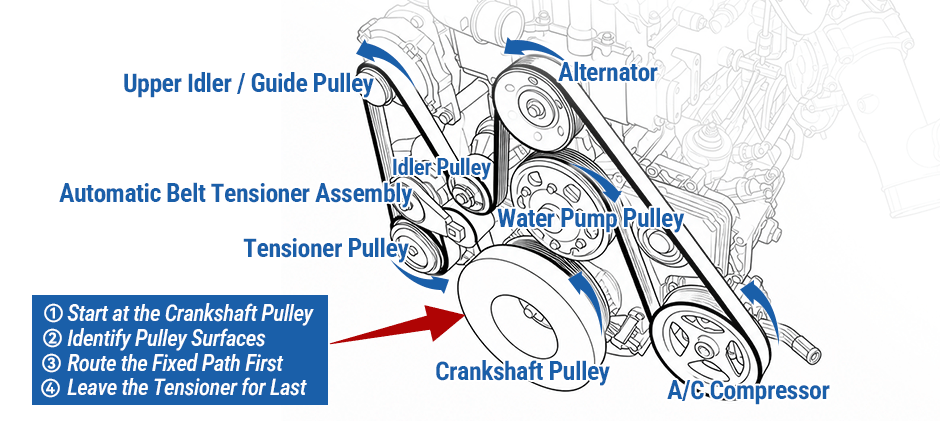
This is also a good time to inspect the water pump pulley, drive belt tensioner, and accessory belt drive. A clean pulley surface and smooth rotation help the belt seat fully.
Main Pulley Guide
| Component | Belt Contact | What to Remember |
|---|---|---|
| Crankshaft Pulley | Ribbed side | Start here |
| Alternator | Ribbed side | Confirm setup before routing |
| Idler Pulley | Often smooth | Guides belt path |
| Power Steering Pulley | Ribbed side | Watch alignment |
| A/C Compressor | Ribbed side | Present on some setups |
| Tensioner Pulley | Often smooth | Usually handled last |
| Fan Pulley | Layout dependent | Follow the exact diagram |
| Water Pump | Layout dependent | Confirm before final tension |
A slow routing process usually prevents a second repair.
How to Confirm the Belt Routing Is Correct After Installation?
The belt should sit correctly before the engine starts. After installation, look at every pulley from more than one angle and confirm that the belt is seated fully in the grooves.
Before startup, make sure:
- Every rib sits fully in the pulley grooves
- The flat side of the belt runs on smooth pulleys only
- The belt sits centered on smooth pulleys
- The tensioner sits in its normal working range
- Any removed covers or intake parts are back in place
After startup, let the engine idle and observe belt movement. The belt should run straight and steady. It should not squeal, chirp, flutter, or move toward the edge of a pulley.
Common signs of a routing problem include:
- Squeal at startup
- Belt walking to one side
- Visible belt flutter
- Weak A/C operation
- Heavy steering feel
- Charging system warning
If any of these signs appear, stop the engine and inspect the routing again. A short review at this point can help prevent belt damage and accessory wear.
Post-Installation Summary
| Symptom | Likely Issue |
|---|---|
| Squeal or chirp | Wrong path or poor belt seating |
| Belt at pulley edge | Misalignment or incorrect routing |
| Weak A/C | Compressor not driven correctly |
| Heavy steering | Power steering pulley not driven correctly |
| Battery warning | Alternator path problem |
| Fast belt wear | Tension or alignment issue |
A fresh belt also works better with stable related parts such as the idler pulley, belt tensioner, and power steering pulley.
5 Practical Tips for Off-Road Machinery Owners
Field repairs need a simple plan. Belt service becomes easier when the right parts and references are ready before a failure happens.
- Keep a Spare Belt Ready – Store a spare that matches the actual machine setup, not just the engine family. Having the correct drive belt on hand before a failure saves time and prevents unnecessary downtime.
- Carry the Correct Diagram – A printed 6.7 Cummins belt diagram in the cab or toolbox can save time during field service.
- Inspect the Belt During Routine Service – Look for cracks, glazing, missing ribs, and uneven wear before the belt fails.
- Replace Weak Support Parts Early – A worn idler pulley or tired belt tensioner can shorten belt life.
- Confirm the Setup Before Ordering Parts – Match the machine configuration to the correct drive belt diagram and belt length.
Small preparation steps can reduce downtime and prevent repeat repairs.
Conclusion
Anyone who has worked on these engines will tell you the same thing: the diagram is your roadmap. Use the correct one, and the job stays straightforward. Guess, and you will likely be doing it twice. Begin by comparing the diagram with the pulley layout and accessory setup on the engine. For replacement parts, FridayParts is a practical choice for off-road machinery owners. It offers aftermarket parts, high-quality products at affordable prices, a vast inventory, and wide compatibility for many heavy equipment brands.
Also Read: How To Change The Serpentine Belt On A 6.7 Cummins?
