

We’ll talk about the clear Ariens drive belt diagram for models, show you how to replace belts, and explain how the tension system works. Whether you need a drive‑belt diagram or replacement instructions for your Ariens zero‑turn mower, we’ve got you covered.
Ariens Ikon XD Drive Belt Diagram
The Ariens Ikon XD is one of the most common zero-turn mowers out there. The drive belt is what makes the mower move, and the best part? This belt setup works the exact same way no matter which deck size you have.
Ariens Ikon XD 52 Drive Belt Diagram
The drive belt system on the Ariens Ikon XD 52 is pretty simple (see Figure 1). The belt runs in a loop and connects three key parts:
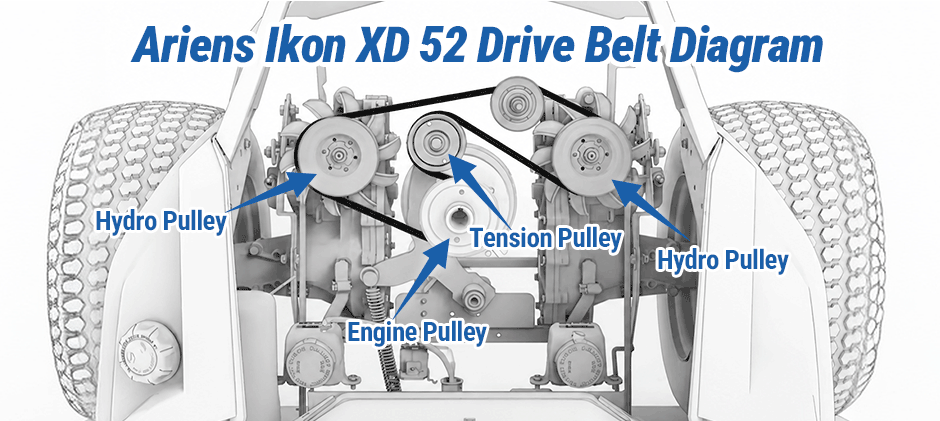
- Engine Pulley: This is where all the power comes from. It’s powered straight by the mower’s engine.
- Two Hydrostatic Pump Pulleys: Zero-turn mowers use separate hydrostatic transmissions for each rear wheel. The drive belt wraps around both pump pulleys to send power to each wheel independently for smooth steering.
- Tensioner Pulley: This spring-loaded idle pulley keeps the belt tight at all times. It automatically adjusts for small belt stretch and stops the belt from slipping while you’re mowing.
Here’s the basic belt path: the belt runs off the engine pulley, wraps around the two hydro pump pulleys, and stays tight thanks to the tensioner. This simple system is what gives your Ikon XD its precise movement and zero-turn steering.
Ariens Ikon XD 60 Drive Belt Diagram
If you have an Ikon XD with a 60-inch deck, the drive belt system is identical to the 52-inch model. Ariens uses the same frame, engine placement, and transmission configuration for these mowers. This means the same Ariens drive belt diagram applies.
Ariens 42 Riding Mower Drive Belt Diagram
This diagram illustrates a key section of the Drive Belt System for an Ariens 42″ riding mower, specifically focusing on the Tensioner Assembly. This system transfers power from the engine to the transaxles, which in turn move the wheels.
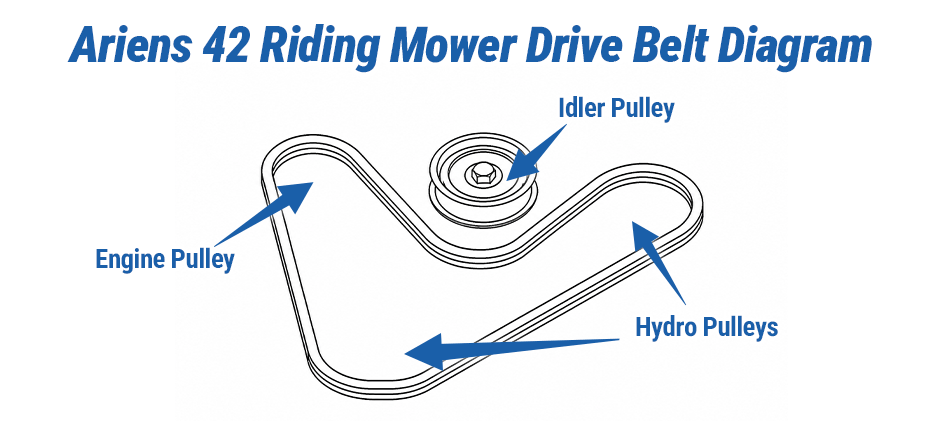
- Engine Pulley: This is the power source for the system. As the engine runs, this pulley spins the drive belt, initiating the transfer of power.
- Tensioner Idler Pulley: This is the system’s tension regulator. It does not transmit power but applies constant, spring-loaded pressure to the outside of the belt. This ensures the belt remains tight, preventing slippage and guaranteeing efficient power transfer.
- Hydro Pulleys (Transaxle Pulleys): These are the power recipients. As the drive belt spins these pulleys, they power the hydrostatic pumps inside the transaxles. This action controls the rotation and speed of the rear wheels, allowing the mower to move forward or in reverse.
How Do You Change a Drive Belt on an Ariens Lawn Mower?
Replacing the drive belt (also called the hydro belt) on an Ariens zero-turn mower is harder than swapping the deck belt. You’ll need to get under the mower and take off a few main parts to get the job done. Take the Ariens Ikon XD as an example. Park your mower on firm, flat ground. Turn off the mower blades, set the parking brake, shut off the engine, and pull out the key.
Step 1: Lift and Secure the Mower
You need to lift the rear of the mower to reach the drive belt. Lower your mower deck all the way down to make extra room to work.
- Put a floor jack under the square support bar at the rear — this bar connects the two hydrostatic transmissions.
- Lift the rear of the mower high enough so you can comfortably work underneath it.
- Set two jack stands under both sides of the mower frame to lock it in place. Never work under a mower that’s only held up by a jack.
Step 2: Remove the Deck Belt and PTO Clutch
The drive belt sits behind the PTO clutch, so you have to remove the whole PTO assembly first.
- Release deck belt tension: Find the spring tensioner for the deck belt. Use a pry bar or a piece of string hooked around the spring to pull back and release the tension, then slide the deck belt off the PTO clutch pulley.
- Disconnect the PTO wires: Locate the PTO clutch electrical plug. Use a small flathead screwdriver to gently lift the locking tab and unplug the connector.
- Remove the PTO bolt: Use a 5/8-inch socket to take out the center bolt that holds the PTO clutch onto the engine shaft. Hold onto the clutch as you remove the bolt — it will drop free once the bolt is out.
- Take off the PTO clutch: Pay attention to the order of the hardware (main bolt, special washer, lock washer). Lower the clutch carefully and slide it off the engine shaft.
- Important Warning: The PTO clutch has an anti-rotation pin that fits into a hole on the mower frame. If you don’t line this pin up correctly when reinstalling, turning on the blades will make the whole clutch spin wildly. This will destroy the wiring and cause major damage to your mower.
Step 3: Release the Drive Belt Tension
The drive belt tensioner is a long, threaded rod with a spring.
- Locate the tensioner assembly near the transmissions.
- To loosen it, you may need to insert a screwdriver through a hole in the frame to hold the head of the bolt still.
- Using a 9/16″ wrench, begin loosening the nut on the threaded rod. You will need to turn it many times to create enough slack in the belt. Do not remove the nut completely, as getting it started again is extremely difficult.
Step 4: Loosen the Idler Pulley and Remove the Belt
Even with the tensioner loose, the belt is often pinched between an idler pulley and the frame, making removal impossible without this extra step.
- Locate the stationary idler pulley that is causing the pinch point.
- You will need to use a 9/16″ closed-end wrench to hold the nut on top of the pulley’s mounting bolt.
- From underneath, use a 9/16″ socket with an extension to loosen the bolt. Loosen it just enough so you can rock the pulley and create a gap.
- With the pulley rocked to one side, you can now work the old belt out. You may need to flatten the belt and carefully “finagle” it through the tight space.
- Once past the idler, unthread the belt from the two transmission pulleys and the tensioner pulley.
Step 5: Inspect Pulleys and Install the New Belt
Before installing the new belt, take a moment to spin the idler pulleys by hand. They should spin smoothly without any grinding noises (which indicate bad bearings) or excessive wobble.
- The new drive belt for this model is typically part number 072-00718.
- Installation is the reverse of removal and can be tricky. Start by routing the new belt through the tight gap past the idler pulley you loosened. This may again require flattening and rotating the belt to squeeze it through.
- Route the belt around the two transmission pulleys and onto the tensioner pulley. Ensure the V-side of the belt is in the groove of the transmission pulleys and the flat side is against the flat tensioner pulley.
- Once the belt is routed, tighten the idler pulley bolt while holding the nut on top.
Step 6: Re-Tension the Belt and Reinstall the PTO
- Tighten the Tensioner: Hold the tensioner bolt head with a screwdriver and tighten the 9/16″ nut on the threaded rod until the belt is firm.
- Apply Anti-Seize: Put a light coat of anti-seize compound on the engine’s output shaft to make future removal of the PTO clutch easier.
- Reinstall the PTO: This is a critical step. Slide the clutch back onto the shaft, aligning the keyway. While holding it up, feel with your fingers to ensure the anti-rotation pin is perfectly aligned with its hole in the frame. Push the clutch fully into place.
- Secure the PTO: Reinstall the bolt and washers and tighten it with the 5/8″ socket. Once tight, try to rotate the clutch by hand. It should not move at all if the pin is properly seated.
- Reconnect Wiring and Deck Belt: Plug the PTO electrical connector back in. Re-engage the deck belt tensioner spring to put the deck belt back on the PTO pulley.
Step 7: Final Checks and Testing
- Manual Rotation Check: Before starting the engine, remove the plastic fan covers from the top of the engine. Manually rotate the engine a few full revolutions by turning the flywheel screen. Watch the drive belt underneath to ensure it is tracking correctly in all the pulley grooves. This simple check can prevent you from shredding a brand-new belt if it’s misaligned.
- Lower and Test: Reinstall the fan covers. Carefully lower the mower off the jack stands. Start the engine for just a moment, then shut it off and do one last visual inspection of the belt’s position. If all looks good, start the mower and test the forward and reverse drive controls.
How to Tighten Belt on Ariens Mower?
Lots of people ask how to tighten a loose belt on their mower. On newer Ariens zero‑turn mowers, both the drive belt and deck belt use automatic spring‑loaded idler pulleys. These pulleys keep the belt at the right tension all on their own.
You can’t manually crank them tighter the old‑school way. If your belt feels loose or keeps slipping, it’s almost always one of these three issues:
- The belt is worn and stretched out. This happens most often. As the belt ages, it stretches. The tensioner can no longer pull it tight enough, so you have to put on a new belt.
- The tensioner spring is weak or broken. After years of use, the spring on the idler arm loses its pull. If you have a brand‑new belt but it’s still loose, check this spring.
- The idler pulley or arm is stuck. Rust and corrosion can lock up the tensioner arm’s pivot or the pulley’s bearing. When that happens, the idler can’t push against the belt like it should.
Conclusion
Follow these steps, and you’ll be able to replace your mower belt with confidence. For this kind of maintenance, high-quality aftermarket parts work great and cost a lot less. You can find the perfect matching drive belt for your mower at FridayParts, so your machine always runs at its best.
