

Are you struggling to wire or troubleshoot your tractor’s starting system? A Kubota ignition switch diagram shows you exactly where each wire connects. Such as heating the glow plugs (Terminal 19), powering accessories (Terminal AC), or cranking the starter (Terminal 50). In this guide, we break down the terminal functions and wire colors so you can fix your machine without the guesswork.
Kubota Ignition Switch Diagram
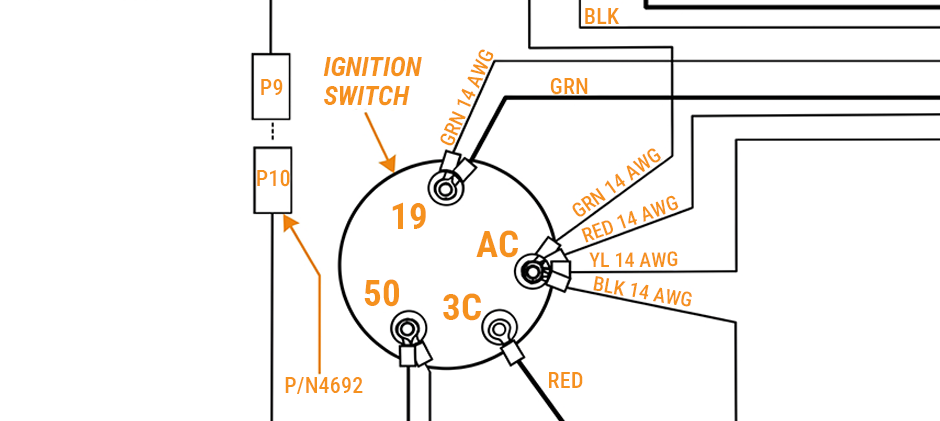
If you check out a Kubota ignition switch wiring diagram, it shows a circle that’s the back side of the switch. It marks every spot where your tractor’s wiring harness connects. Getting the tractor wiring right stops short circuits, blown fuses, and starter motor damage.
This diagram is for common 4 or 5-position switches you’ll find on lots of heavy equipment. It has terminal tags like 19, 50, AC and 3C. Use this schematic to hook up the right power supply to each function.
Kubota Ignition Switch Terminal Functions Explained
Every metal pin on the back of the switch does a different job. The letters and numbers stamped beside these pins show which system they control. Using this Kubota ignition switch diagram, here’s a clear breakdown of each terminal:
- Terminal 3C (Battery Power Input): This is your main power line. It gets voltage straight from the battery. When you turn the key, internal contacts inside the switch link this terminal to the others, sending power out where it’s needed.
- Terminal AC (Accessory): This terminal runs extra electric parts on your tractor. Turn the key to the first click, and power goes here to fire up dash lights, gauges and safety sensors. You can check your fuel gauge or hour meter without starting the engine.
- Terminal 19 (Glow Plugs / Pre-Heat): Diesel engines need heat to start when it’s cold. Turn the key left or hold it at the pre-heat spot, battery power runs through Terminal 19 to the glow plugs. This heats up the engine cylinders.
- Terminal 50 (Starter Motor): This is the cranking terminal. Turn the key all the way right against the spring, and power flows through Terminal 50 to the starter solenoid. Once the engine starts and you release the key, the spring snaps the key back to the “Run” position. It cuts power to this terminal so the starter stops spinning.
What Do the Wire Colors Mean?
Matching wires to the right terminals matters just as much as understanding what each terminal does. The diagram lists specific wire colors and sizes, most are 14 AWG (American Wire Gauge) wire. Here’s what each wire color usually means for this setup:
- RED (Red Wire): Red is almost always constant battery power. On the diagram, a solid red wire hooks up to the main power input, usually 3C or other battery terminals. It carries main voltage from the battery to the switch.
- GRN (Green Wire): Green wires connect to Terminal 19 on the diagram. For diesel tractor wiring, green typically sends power to the dash glow plug indicator light and the glow plugs.
- YL (Yellow Wire) and BLK (Black Wire): These wires hook to the AC (Accessory) terminal. They pass power to dash gauges, headlights and safety switches.
- WH (White Wire): White wires usually work as a ground or a secondary power path for certain relays, like the starter relay wired to Terminal 50.
Sticking with the right wire gauge (14 AWG) makes sure the wires can carry the electric current without melting or creating a fire risk.
Common Kubota Ignition Switch Problems and Symptoms
Dust, moisture and regular use wear down the ignition switch’s inner contacts over time. Once that happens, your tractor starts acting weird. Catching these early warning signs keeps you from getting stuck out in the field.
- Loose or damaged key: If your original key gets a tiny hairline crack, it can snap off right inside the lock cylinder. The internal tumblers also wear out. You may notice the key won’t lock into the proper positions easily.
- Failing to trigger the glow plugs: The inside of the switch goes bad. It won’t shift to the right spot to activate the glow plugs. You have to jiggle and twist the key around just to turn on the dash lights and warm up the engine. If you need to wiggle the key to keep the tractor running, the copper contacts inside are probably burnt or corroded.
- Dead silence when you turn the key to the start position: If your battery is fully charged but the starter makes no clicking sound, the switch most likely can’t send power through Terminal 50.
When you run into these problems, cleaning the switch almost never helps. Replacing the whole switch is the best solution.
How to Replace a Kubota Ignition Switch?
Swapping out a bad switch is a straightforward process that you can do in your garage with basic hand tools. While the switch sits buried in the dashboard, taking a few extra steps makes the job much easier.
Step 1: Disconnect the Battery
Always disconnect the negative battery cable before touching electrical parts. This prevents sparks and protects the tractor’s fuses.
Step 2: Remove the Instrument Cluster
Many people try to reach their hands up behind the dashboard to unplug the switch. This area is very tight and dark. It is actually much easier to remove the instrument cluster. Simply take out the four bolts holding the dash panel in place. Pull the cluster out and set it on top of the steering cowl. This gives you wide-open access to the back of the ignition switch.
Step 3: Unplug the Wiring Harness
Look at the back of the switch. You will see a plastic connector block holding all the wires. Press the small plastic push-tab on the side of the connector and pull it straight back. It should slide off the metal terminals easily.
Step 4: Remove the Old Switch
On the front of the dashboard, there is a threaded locking ring holding the switch in place. Unscrew this ring. Push the old switch backward through the hole and pull it out of the dash cavity.
Step 5: Install the New Switch
When you buy replacement parts, you want components that fit perfectly and last a long time. As a trusted aftermarket parts supplier, we provide high-quality products at affordable prices. We carry a vast inventory with wide compatibility for many heavy equipment brands, ensuring you get a reliable switch that matches your exact machine.
Take your new switch and push it through the hole from the back of the dash. Look for a small metal alignment tab (stanchion) on the side of the switch. Line this tab up with the notch in the dashboard hole. This keeps the switch from spinning when you turn the key. Screw the locking ring back onto the front and tighten it down securely.
Step 6: Reconnect and Test
Plug the plastic wiring connector into the back of the new switch. It only fits one way, so you cannot plug it in backward. Make sure the wires clear the steering column. Reinstall the instrument cluster and put the four bolts back in. Finally, reconnect the battery. Put your new key in, turn it to heat the glow plugs, and start the engine to verify all functions work correctly.
Final Thoughts
A clear Kubota ignition switch diagram makes electrical repairs way less stressful. Match the right wire colors to each terminal, and your glow plugs, accessories and starter motor get power exactly when they need it. Get the aftermarket tractor replacement parts you need at FridayParts.
