

How to operate a mini excavator comes down to a few steps. First, inspect the machine. Then drop the blade for stability, learn the joystick pattern, and use a smooth dig, swing, and dump cycle. Moving the machine is easy. Using it well takes more attention. That gets the machine working the way it should and helps avoid the mistakes that waste time or damage parts. The details matter, though. Bucket angle, track position, and throttle control all matter. Small changes in any of them can make the work cleaner, faster, and safer. Read on to find out how to apply them on the job.
A Brief Introduction to Mini Excavator
A mini excavator is made for tight access, lighter earthmoving, and jobs where a full-size machine is too large for the site. Typical work includes trenching, footing prep, landscaping, stump removal, backfilling, small demolition, and pool or pond excavation. With the right attachment, the same machine can also handle drilling, grading, or material placement.
That range of use is exactly why proper technique matters. Knowing how to operate a mini excavator is not only about making the arm move. It affects:
- trench accuracy
- cycle speed
- machine balance
- track and hydraulic wear
- fuel use
- safety near buildings and buried lines
Mini excavators are easier to transport and maneuver than larger excavators, but they still require a disciplined approach. Smooth operation protects the site and also protects the machine. Keeping reliable mini excavator parts, hydraulic components, and attachment wear parts available can help maintain predictable performance over time.
Before You Start: Checks That Prevent Costly Mistakes
Anyone learning how to operate a mini excavator for beginners should start with a walk-around, not the ignition key. A few checks before startup can prevent downtime, rough operation, and avoidable safety issues.
Quick Pre-Start Checklist
| Check Item | What To Look For | Why It Matters |
|---|---|---|
| Ground condition | Level, firm surface | Lowers tip risk |
| Work zone | Obstacles, people, structures | Helps keep travel and swing clear |
| Underground area | Pipes, cables, drains | Reduces strike risk |
| Overhead clearance | Lines, branches, roof edges | Prevents contact while raising boom |
| Hydraulic hoses | Leaks, cracks, loose fittings | Protects pressure and function |
| Tracks | Damage, debris, proper condition | Improves travel control |
| Fluids | Engine oil, coolant, hydraulic oil, fuel | Helps avoid heat and wear |
| Bucket and pins | Loose or worn connection points | Keeps attachments secure |
| Cab safety items | Seatbelt, warning lights, lock lever | Safer startup and operation |
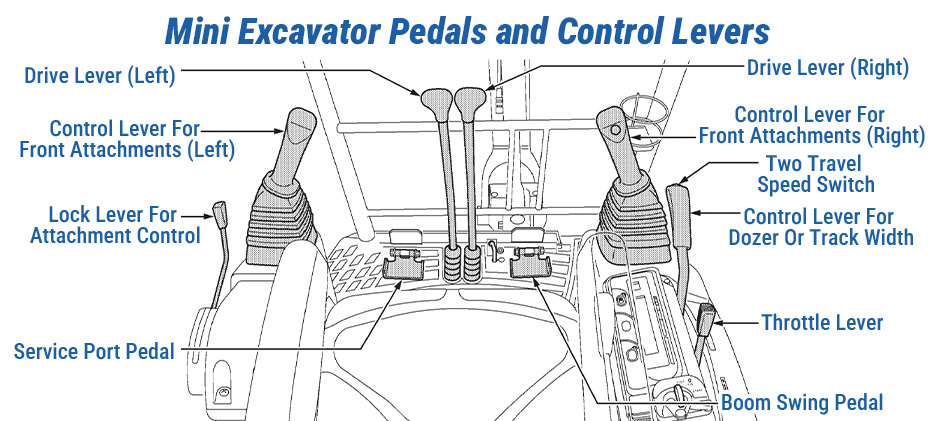
Use three-point contact when entering the cab. Fasten the seatbelt before starting. Make sure the machine is on stable ground before any digging begins. If it is your first time with a specific model, spend a minute identifying the starter, throttle, travel levers, blade lever, joysticks, and safety lock lever.
A machine that feels loose or slow to respond may not only need more practice. New control levers, travel motors, seal kits, or hydraulic pumps can improve the feel of the machine more than many operators expect.
Controls Explained In A Practical Way
A lot of confusion around how hard it is to operate a mini excavator comes from seeing several controls at once. In practice, the core pattern is straightforward once the hand movements match the machine response.
Main Controls
- Left joystick
- Forward and back move the stick in and out
- Left and right swing the upper structure
- Right joystick
- Forward and back lowers or raises the boom
- Left and right curls or dumps the bucket
- Travel levers or pedals
- Move the machine forward and backward
- Allow tighter turns by controlling tracks separately
- Blade lever
- Raises and lowers the dozer blade
- Adds stability during digging
- Auxiliary pedal
- Powers certain attachments such as augers
- High-speed button
- Increases travel speed
- Best used for straight movement across open ground
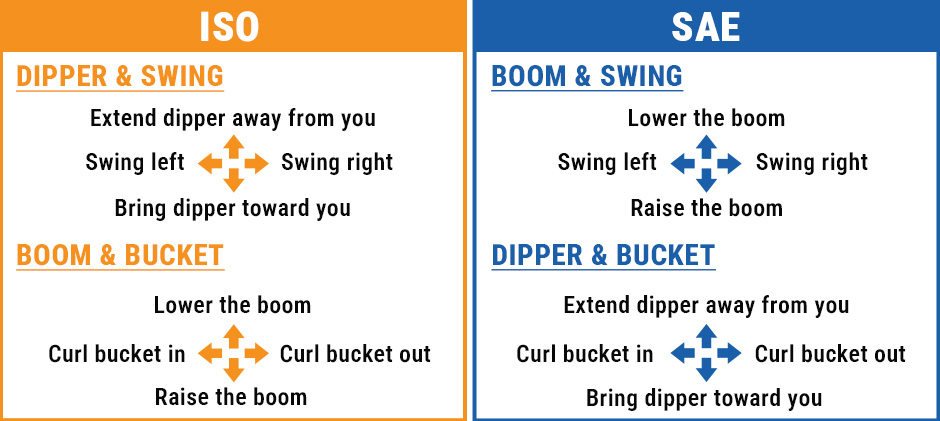
This layout is common on many machines, but exact patterns can vary by model. The basic process remains similar, but the control feel and layout can differ enough that a short test run is always worth doing.
How To Operate A Mini Excavator Step By Step?
The simplest way to learn how to operate a mini excavator is to follow the same sequence every time until it becomes natural.
Start And Warm Up
Start the machine and let it idle briefly. Give the hydraulic system a short warm-up, especially in cool weather. Keep the throttle around half power at first. That gives enough response to learn the controls without making the machine feel too jumpy.
Lower The Blade
Before digging, lower the dozer blade until the machine feels planted. This improves stability, helps with leverage, and makes the machine more predictable when the bucket enters the ground.
Practice Basic Movements
Before making the first cut, cycle through these motions in an open area:
- raise and lower the boom
- extend and retract the stick
- curl and dump the bucket
- swing left and right
- move forward and backward
This short practice helps build smoother control and reduces overcorrection once digging starts.
Make The First Dig
For a basic trench or hole:
- lower the boom until the bucket teeth meet the ground
- extend the stick to place the bucket
- curl the bucket while retracting the stick
- raise the boom with the loaded bucket
- swing toward the spoil side
- dump the bucket
- return to the cut and repeat
The cleanest bucket fill usually comes from combining bucket curl with stick retraction, not from forcing the bucket straight down. That one habit makes a noticeable difference in digging speed and control.
Move The Machine Correctly
When traveling:
- keep the bucket low to the ground
- raise the blade slightly for movement
- slow down before turning
- use high speed only when the path is open
- travel straight up or down a slope, not across it
If travel feels rough or unbalanced, inspect the undercarriage and rubber tracks, and check whether wear in the final drive parts or idler components is affecting control.
Common Mistakes And Better Habits
Many first-time operators focus on getting the bucket into the ground and forget what happens around that action. Most poor results come from a few repeated mistakes.
Common Errors
Overloading the bucket
A bucket that is too full adds strain, slows the cycle, and can affect balance.
Digging without lowering the blade
This reduces stability and makes the machine feel less settled.
Using too much throttle too soon
Higher engine speed is not always better, especially when learning.
Swinging over people or vehicles
The swing area should remain clear at all times.
Skipping inspections
Low fluids, damaged hoses, or track issues often show up before they become breakdowns.
Working without checking utilities
Buried services and nearby structures need to be identified before digging starts.
Better Habits
- take smaller, controlled cuts
- keep spoil on one side for a cleaner cycle
- pause and reset if the machine feels off balance
- test all functions before real work begins
- slow down near walls, fences, and corners
This is also where machine condition matters. Smooth digging is easier when bucket teeth, pins and bushings, hydraulic cylinders, and other excavator replacement parts are still in good working shape.
How To Work Faster Without Getting Sloppy?
Once the basics feel comfortable, efficiency becomes the next target. Faster work does not come from aggressive inputs. It comes from cutting out wasted motion.
Efficient Digging Cycle
| Step | Best Practice |
|---|---|
| Setup | Keep spoil close but clear of the tracks |
| Stability | Blade down before the cut |
| Entry | Set bucket teeth at the right angle |
| Fill | Curl bucket while pulling the stick back |
| Lift | Raise only as much as needed |
| Swing | Keep the arc short |
| Return | Reset bucket angle during swing back |
A shorter swing path saves time on every cycle. Clean spoil placement also helps avoid extra repositioning. For trench work, it often makes sense to begin at the far end and work back toward the machine so visibility and track position stay consistent.
If the job changes through the day, quick access to the right attachments, quick couplers, and service parts helps keep production moving without long setup delays.
Final Words
Good mini excavator work comes down to control, balance, and routine checks before problems start. Once those basics become habit, the machine is easier to run and more productive on every job. For replacement needs, FridayParts offers high-quality aftermarket parts at reasonable prices, with wide equipment compatibility and a large selection for many heavy machinery brands.
