
The exhaust gas temperature (EGT) sensor checks how hot the exhaust gets, helping protect the turbo and aftertreatment parts from overheating. In this guide, we’ll cover what it does, common exhaust gas temperature sensor failure symptoms, and how to test it—so you can handle repairs the right way and make the most of this growing service need.
How Do Exhaust Gas Temperature Sensors Work?
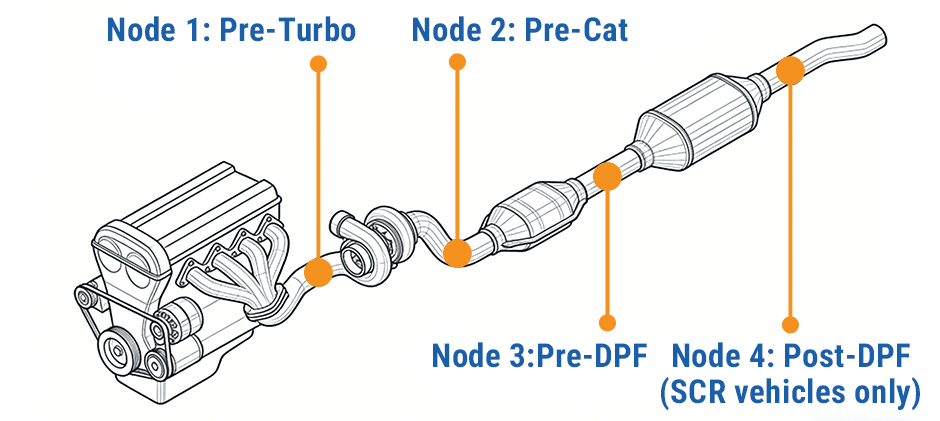
EGT sensors are usually probe-style. One end sits in the exhaust—like in the manifold, near the turbo, or around the DPF. Many heavy machines use more than one sensor to check temps in different spots.
The other end connects to the ECU. It uses this data to control the aftertreatment system and protect key parts in real time.
Most EGT sensors use NTC thermistors, meaning their resistance drops as temperature rises. The ECU reads this change to calculate exhaust temperature. On diesel engines used in heavy equipment, EGT sensors play a key role in controlling DPF regeneration and preventing overheating of the turbo and exhaust system components.
Exhaust Gas Temperature Sensor Failure Symptoms
When an EGT sensor starts to fail, the machine will show some clear signs.
- Dashboard warning lights and codes: The most obvious sign is warning lights. You may see the check engine light, DPF light, or a flashing glow plug light. If the sensor data doesn’t make sense (like low temp under heavy load), the ECU will set a code. Common ones are P0544 and P0546.
- “Silent failure” of PTC sensors: Sometimes the sensor doesn’t fail completely—it just gives wrong readings. It still works, and no code shows up, but the data is off. You may notice low power, higher fuel use, or DPF issues. This is risky because the problem is easy to miss.
- Impact on DPF regeneration: The EGT sensor helps decide when the DPF should regen. If it’s faulty, the machine may regenerate too often or not at all. Over time, the DPF can clog. In serious cases, the machine goes into limp mode with low power.
- Fuel efficiency and power loss: When the data isn’t reliable, the ECU plays it safe. It may add more fuel or reduce boost. This leads to higher fuel use and less power. Under heavy load, the machine may feel weak and struggle to hold RPM.
- Engine performance issues: You may see rough idle or vibration. In cold weather, starting can be harder. This happens because the ECU is getting bad temperature data.
- Black smoke and wet stacking: Check the exhaust. A bad sensor can cause black smoke from poor combustion. In worse cases, unburned fuel builds up in the exhaust system. This can damage the turbo and aftertreatment parts.
The Root Causes of Sensor Failures
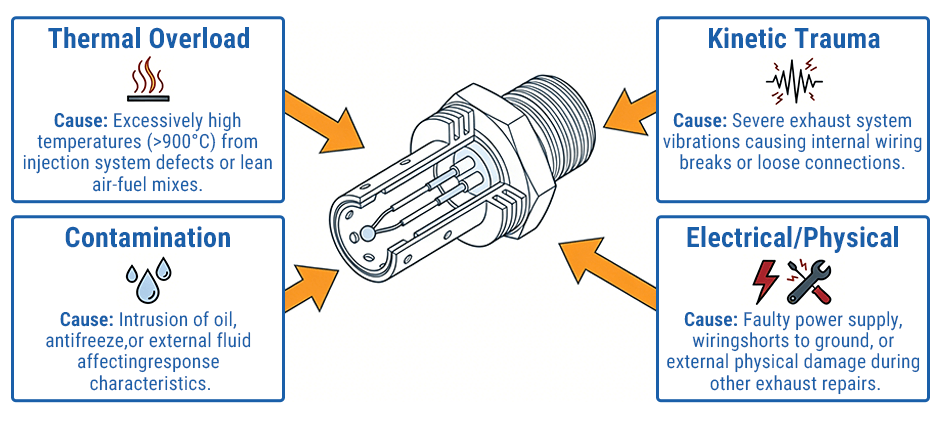
Knowing why these sensors fail helps us do better preventive maintenance. In construction and mining, these sensors get pushed to their physical limits every day.
Excessive Heat Soak
Even though they handle high heat, long exposure to temperatures over 900°C — often from a leaking fuel injector or a clogged air intake — will burn out the internal sensor part.
High-Impact Vibration
Off‑road machines deal with constant shaking and pounding. Whether from a rock crusher or a rough skid steer on a demolition site, these vibrations can weaken internal wiring or loosen small electrical pins.
Fluid Contamination
Sensors can get “poisoned” by oil or coolant. If a head gasket or turbo seal leaks, these fluids get into the exhaust and coat the sensor tip, making it slow to respond or stop reading entirely.
Grit and Physical Stress
Bending or twisting the wiring during exhaust repairs can break internal wires that you can’t even see from the outside.
Testing for a Bad Sensor
If you think the sensor has failed, use this step-by-step check before replacing any parts.
- Visual Inspection: Check the connectors for corrosion, green buildup on the pins, or loose clips. Look for wires rubbing against the frame or exhaust heat shields.
- Check ECU Power: Turn the ignition on with the sensor unplugged. Use a good multimeter to test voltage at the wiring connector. You should get a steady 5V from the ECU. If there’s no voltage, the issue is in the wiring or the ECU.
- Test Resistance (Ohms): Set your meter to ohms (Ω) and touch the probes to the sensor terminals. Compare the reading to the manufacturer’s specs. If the meter shows “OL” (open circuit) or a number way out of range, the sensor is bad.
- Scan Tool Live Data: Use a diagnostic scanner to check temperature in real time. If the reading stays at -40°C or spikes 500 degrees in a second, the sensor is faulty. Watch for codes like P2033 or P0549.
WARNING: Never connect the sensor directly to 12V/24V battery power. Also, don’t use an ohmmeter on smart or active sensors unless the manufacturer says it’s safe. These thin-film parts can be permanently damaged by even small currents from the wrong tester.
Best Practices for Replacement and Maintenance
Replacing an EGT sensor is routine work, but you need to be careful to make it last.
- Confirm the Location: A single excavator can have four or more EGT sensors (before turbo, after turbo, before DPF, after DPF). Always make sure you’re replacing the exact one shown by the fault code.
- Torque Specifications: Always use a torque wrench. We recommend tightening to 40–45 Nm. Not tight enough causes exhaust leaks that mess with O₂ sensor readings. Too tight can crack the sensor body or damage manifold threads.
- Thread Coatings: Most good replacement sensors already have coated threads. If it’s pre-coated, don’t add extra anti-seize or thread compound. Extra paste can get on the sensor tip and ruin it, causing slow or wrong readings right away.
- System Reset: After installation, clear all fault codes. Then test the machine in the field to make sure the DPF regenerates properly and all the earlier performance issues are gone.
Conclusion
How well your off-road machine runs long-term mostly depends on how healthy its sensors are. Keep an eye out for early signs of EGT sensor failure to avoid engine damage. Do regular visual checks, follow the right diagnostic steps, and replace any faulty parts. FridayParts has high-quality aftermarket parts for all kinds of equipment and brands—they’re compatible, so you can fix it right the first time.