
When the charging system warning light shows up on your dashboard, it means your electrical system isn’t working as it should — the battery is no longer being charged.
Ignoring this light can leave you with a dead machine in the middle of a job. This guide will help you find the cause and solve it quickly so your machine doesn’t stop when you need it most.
What Does the Charging System Warning Light Mean?
This light signals a problem in the charging system, not just a bad battery.
Your system includes the alternator, battery, voltage regulator, and wiring.
When something fails, the voltage drops, and your battery starts providing all the power on its own.
You can think of it like this — your machine is running on battery power only, disconnected from its charger.
4 Common Reasons Why the Charging System Light Is On
The light can turn on for several reasons.
In off-road equipment, dirt, vibration, and rough conditions often make the problem worse.
1. Damaged or Failing Alternator
The alternator makes the electricity that runs the machine and charges the battery.
Over time, dust, heat, and vibration wear it out. If it fails, the warning light will come on right away.
2. Worn or Loose Belt
3. Weak or Bad Battery
If your battery is old or damaged, it won’t hold a charge even if the alternator works fine.
This can also cause the light to appear while the electrical system struggles to keep up.
4. Loose or Corroded Connections
Mud, moisture, and vibration cause corrosion or loose wires around the battery and alternator.
Bad connections increase resistance, stopping power from moving through the system correctly.
How to Troubleshoot the Problem in 5 Steps
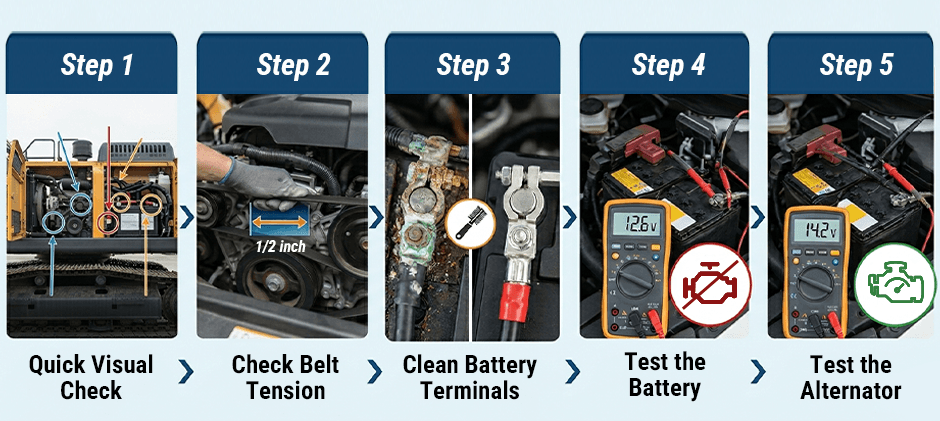
You can find the cause with a few basic checks.
Always turn the engine off and remove the key before starting.
Step 1: Quick Visual Check
Look under the hood.
See if the belt is still in place and tight, if any wires are loose, or if the battery terminals are covered in powdery corrosion.
Step 2: Check Belt Tension
Press on the belt midway between pulleys.
It should move only about half an inch.
If it’s too loose or shows cracks, replace it.
Step 3: Clean Battery Terminals
Disconnect the battery (negative terminal first).
Use a small brush with baking soda and water to remove corrosion.
Reconnect tightly (positive first).
Step 4: Test the Battery
Use a multimeter.
A healthy battery should show about 12.6 volts when the engine is off.
If it’s below 12.2 volts, it’s weak or discharged.
Step 5: Test the Alternator
Can You Keep Running With the Light On?
No, not for long.
When this light comes on, your machine is using battery power only.
Once that power runs out, everything stops.
Depending on the load and battery condition, this could happen in minutes or an hour.
Stop as soon as it’s safe and fix the issue before continuing work.
Conclusion
When your charging system light turns on, stop and check your alternator, belt, battery, and wiring before the machine leaves you stranded. A few quick tests can help you find the cause fast and prevent costly downtime.
If you need replacement parts, look for reliable alternators, belts, batteries, and electrical components designed for off‑road machinery in the FridayParts Electrical System Parts category — built to keep your equipment powered, charged, and ready for work.